|
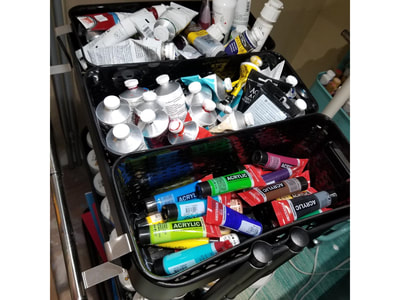
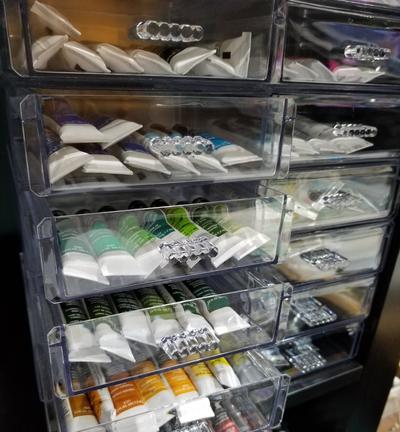
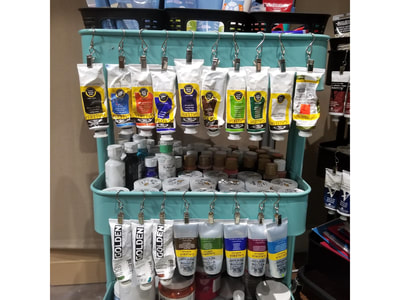
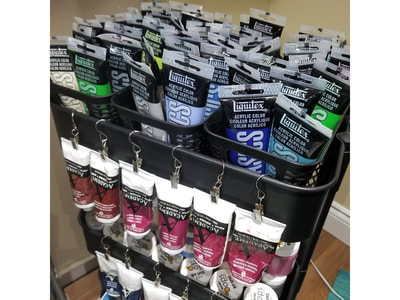
Hello Friends, Are you looking for storage and organizing ideas for your paints? You are in luck, because on my blog today, l am going to share with you different DIY ideas and economical ways that l use to keep my artist paints organized and uncluttered. There are so many different brands of paints on the market, all in different shapes and sizes, and it can be a challenging task to keep paints organized. Some require more room and unique storage ideas and as your passion for painting grows, so does your collection of brands. Painting for over twenty years and having the desire to try different paint brands, has left me with a vast variety of tubes, and bottles in all different shapes and sizes. After having a few disasters with my paints, solely because l was careless with them, I was determined to put a stop to my paint tube disaster. My professional paints are a hefty investment, so I started looking for ways to organize my inventory to help keep my paints grouped, knowing what colours needed to be replenished and the biggest advantage was spending less time finding the colours l wanted to use. I can’t take credit for all my organizing efforts, as my hubby is skilled in building what l dream up, l am so lucky and grateful for his support. He has for sure helped me build a lot of my projects, so finding extra help can come in handy with some of your DIY projects. I have tried to keep my ideas simple and economical. I tend to be a frugal shopper but l also try to use or buy materials that are sturdy and will last, so keep that in mind when you are finding other ideas to organize. Sometimes it is worth paying a bit more to get durability and longevity. For some, portability is important and l kept this in mind when l was organizing my art studio. If l had to move, most of my systematic ideas could move with me. 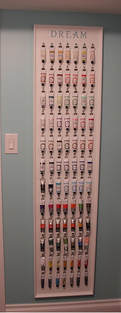 1. DIY Binder Clip Paint Tube Organizer Let me show you one of my favourite DIY storage ideas in my studio. Professional artist paints in general can run you a crazy amount of money, especially oil paints. I wanted a way to store them, not only for easy accessibility but also to prevent tube leakage. I first saw this idea on Pinterest, and totally fell in love with it. I was determined to build one that would match my studio. The first step is to measure your wall space and establish how big you can make one. The size of your paint tubes will be the determining factor in choosing the spacing on your board. My wall allowed a board that would hold 84, 37 ml tubes. You can hang 150 ml tubes, only you have to space them out according to the size of your board. For this project l used a large piece of MDF, binder clips, screws, paint, measuring tape, nails, wood glue, thin trim board, and of course an amazing hubby who constructed it for me. The most time consuming part to this project was measuring out the distance for your tubes, and screwing in all your binding clips. Once hung on the wall, you can organize your tubes of paint to your desire. 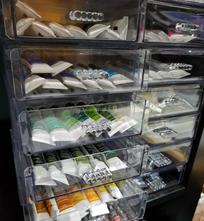 2. Stack-able Storage Makeup Organizers Using storage stack-able makeup organizers are a perfect idea and size for storing smaller paint tubes. Not only are they economical as l paid a $1.25 each at the Dollar Tree, but they are stack-able and they look visually pleasing on a shelf. I use them to store my 5 and 7.5 ml watercolours, but l would think you could fit a bigger sized tube if needed. Being that they are clear, I organize my paints by colours, making it a breeze to find the ones l need quickly. This is a simple storage idea that is easy to rearrange and add more containers too, as your collection expands. 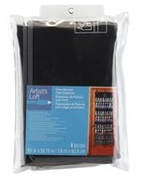 3. Door Hanging Organizer I found a door-hanging organizer four years ago, made by “Artist Loft” useful for storing larger sized 118 ml tubes. You could also use an over the door shoe organizer, but try and find one that is made of durable material, (these are also great for storing spray paint cans), or it won’t sustain the weight. The one l used had 84 slots. l have since, removed this organizer, but it was an economical and easy idea l used for a few years, so l thought l would include it in this blog. 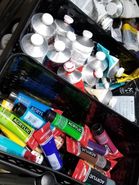 4. Trolley Cart My most often used acrylics are stored in rolling trolleys. They are movable and l can store a lot of paint in them. I like that they are made of metal, so you can hang other useful magnet organizers and hooks on them. I personally love this option because they are super durable and portable. I keep mine near my easel for easy access when l am painting. I found perfect sized baskets, at my local Dollar Tree, to keep the colours organized by brands and sizes. 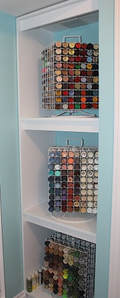 5. Rotating Paint Racks This storage suggestion is ideal for 2oz. /59 ml bottles. I have used these rotating paint racks for years, but they are superb for finding colours quickly and are overall durable. The only con is they take up a lot of space. The ones l use hold 160 bottles but l have seen online smaller racks that hold 112 bottles. They are super heavy when stocked, so you need to make sure it sits on something sturdy. 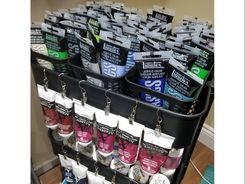 6. Hanging Clamps with S Hangers This organizing idea is super easy, economical and ideal to hang your paint tubes neatly. I found these hangers on Amazon, 50 for $13.99. They clip to the bottom of your paint tube, and because they have an S hook you can hang them from a rod or anything that you desire. I found hanging them from the edges of my trolley worked well. I absolutely love this idea, because looking for the colours l need is effortless. Visually it looks neat and tidy and it is an extremely affordable idea. I would love to hear some of your organizing ideas, so please feel free to comment and share them with me. Mastering the mess helps me feel comfortable in my haven and l hope that l have inspired you in some way to do the same.
Wishing you all a beautiful day, Alice
4 Comments
Darrell Olsen
10/18/2018 01:23:01 pm
Excellent advice Alice, thank you for tagging me on Instagram. 👏👌
Reply
Alice
10/18/2018 01:33:45 pm
Thanks so much Darrell :) thank you for reading it and leaving me a comment.
Reply
10/15/2021 09:09:15 am
I am particularly interested in the hanging S which you clip to a rolling trolly. The rolling trolly cart idea is interesting to me too but I am not clear just what the trolly looks like and the dividers in it??? thank you so much for sharing...
Reply
Leave a Reply. |
AuthorAlice is a realistic full time visual artist with over 25 years of experience in her art career. Passionate about helping others grow in their creative process. Alice shares invaluable tips and strategies on her blog to help readers improve their art practice. When not in her studio, Alice enjoys teaching and cooking. Connect with Alice on Instagram, Facebook or visit her website at www.alicemelofineart.com Archives
July 2024
Categories |
 RSS Feed